Tuesday, July 31, 2012

Cute Holiday Hairstyle Tutorial

Cute Holiday Hairstyle Tutorial


This style is easy to wear to most any occasion, whether a party or a more casual event. Have fun styling!

SOURCE / THE PERFECT HOLIDAY HAIR TUTORIAL

Tutorials You Should also see :

How to french braid your own hair

How to french braid your own hair


I adore a pretty french braid! It's such a classic hairstyle that can work on many different hair lengths, including locks with layers.

SOURCE / HOW TO STYLE A CLASSIC FRENCH BRAID

Tutorials You Should also see :

Monday, July 30, 2012

The Waterfall Braid Tutorial

The Cascade/Waterfall Braid


I think that braids are one of the most versatile and easy hairstyles to wear during Autumn. They are textured and seemingly unintentional, or smoothed and polished.

SOURCE : TRICKS + TREATS: CASCADE BRAID WITH SARAH

Tutorials You Should also see :

Twisted Bun Tutorial

HOW TO STYLE A TWISTED BUN posted on abeautifulmess


Have fun trying this cute look! It's perfect for a wedding, date night or holiday party!

SOURCE : HOW TO STYLE A TWISTED BUN

Tutorials You Should also see :

Sunday, July 29, 2012

messy bun tutorial

messy bun tutorial posted on abeautifulmess


For those 2nd day hair days when your hair just does not look right down. Put it up in this cute messy bun for a fun. I think this might be one of my favorite tutorials to date.


SOURCE : HOW TO STYLE A MESSY BUN

Tutorials You Should also see :

Cute Heidi Braids

the heidi braids posted on abeautifulmess


This is my favorite new way to wear my hair. I am obsessed with a braided crown! I love how it looks pulled together, yet still laid back.

Source : MAIDEN TWISTS HAIRSTYLE D.I.Y.

Tutorials You Should also see :

Saturday, July 28, 2012

How To do a french braid hairstyle

How To do a french braid hairstyle


French Braid Hairstyles go really well with medium or long hair and give you a classic and neat hairstyle.

Tutorials You Should also see :

The Side Braid : hair tutorial

The Side Braid posted on abeautifulmess


How to :
  1. Gather a large section of your hair starting from one side of the crown of your head and sweeping to the other side.
  2. Begin braiding three small strands from the top of this section.
  3. As you braid add more strands from the original section.
  4. Be sure to braid so that your hair wraps around the top of your head.
  5. Finish by wrapping one strand around the entire braid, securing it in place. You could use a hair tie as well and wrap the hair around the hair tie, hiding it.

Source : HOW TO STYLE A SIDE BRAID: TWO WAYS!

Tutorials You Should also see :

Friday, July 27, 2012

How to give yourself Natural looking curls

Natural looking curls posted on michaelanoelledesigns


How to :
  1. Get your hair a little damp (I did it dry & it worked fine) .
  2. Put the elastic headband around your head (partly over your forehead) .
  3. Get a section of hair and twist away from face .
  4. Loop it around headband and add hair to your next twist (My mistake was looping it around all at once. Once you loop it, take the remaining hair and add a little more, twist and then loop again) .
  5. Repeat around the entire headband .
  6. Get a good nights rest .
  7. Take off the headband when you wake up and run your fingers through (Don’t worry, if you look like Shirley Temple, the curls will relax within a few minutes)
Voila, you now have the perfect curls/waves.

Source : {Almost!} No Heat Curls

Tutorials You Should also see :

braided bun hairstyle


braided bun hairstyle


are you searching for a new hairstyle?. You can create these pretty, easy-to-do buns and braids in just minutes.

Tutorials You Should also see :

Thursday, July 26, 2012

Cute Loose Braids

Cute Loose Braids


braid then pull and loosen. So cute Gotta try this on my niece.

Tutorials You Should also see :

Wednesday, July 25, 2012

Music Note Nails tutorial

Music Note Nails posted on thelifefiles


a list of what you will need:
  • A light colored base nail polish
  • Black nail polish with a thin tipped brush
  • Dotting nail tool, which can be found at any beauty supply store or at Sephora for 3 bucks.
  • Oh, and don’t forget to paint your nails with a clear topcoat once you’re finished.

Source : the.NAIL Files: D.I.Y. Music Note Nails

Tutorials You Should also see :

Tuesday, July 24, 2012

How to style the updo hair tutorial

How to style the updo hair tutorial posted on haircolorsideas


Tousled and towering, this has a great nonchalant French-film-star air.

IDEAL FOR : Hair with texture thick, curly or color-treated.

IT's OKAY IF : It turns a little lopsided, That ust adds to the sexy bedhead feel.

How to :
  1. Backcomb the hair at the crown, here's how : pull up a two-inch section of hair. then comb backward, in short, choppy movements
  2. Smooth the hair over the teased section, toward the bock of your head. you'll undo some of the back-combing, but that okay.
  3. Gather hair at the nape, using your hand as an anchor, with your free hand; twist the loose portion all the way down to the ends.
  4. Flip the twisted section up against the back of your head, tucking the ends into the base of the twist. holding the twist in place, secure with hairpins

Source : haircolorsideas.com

Tutorials You Should also see :

Monday, July 23, 2012

braid loop hair tutorial

braid loop hair tutorial posted on haircolorsideas.com


IDEAL FOR : long hair.

BUT IF YOU HAVE A BOB : Start the braids above your ears ( and toward the sides of your head ). That way, the braids won't have to reach very far.

PREP : Depending on your hair, work in anti-frizz, smoothing or texture products before drying.

  1. Center part your hair and make two pigtails at the back of your head. if your hair is shorter, the pigtails can be on the sides of your head, above the ears.
  2. Braids both pigtails - make sure they're tight - and secure each with an elastic.
  3. Wrap one braid over your head, setting it about one inch back from your hairline and securing the ends with bobby pins.
  4. Wrap and secure the other braid in the same way. ( the braids might overlap or meet, depending on your hair light.)

Source : haircolorsideas.com

Tutorials You Should also see :

wedding braids hair tutorial

wedding braids hair tutorial posted on joannagoddard


How to :
  1. Start by making two pigtails, using rubber bands. Make them a bit higher up on your head.
  2. Braid both pigtails...
  3. ...and secure ends with a rubber band.
  4. Remove the top rubber bands from the pigtails.
  5. Cross one braid over the other.
  6. Starting with the braid that's now on top, create a sort of "C" shape and pin. It doesn't have to be precise; you just want to have a nice curved shape from the braid.
  7. Make the same curved shape with the other braid and pin. Curve it up and over the top of the braid you just pinned down.
  8. Ultimately, you want to get a nice sort of pretzel or knot shape from the two braids. Tuck the ends of both braids behind the knot and pin them down securely.

Source : DIY wedding hair: Pretzel braid

Tutorials You Should also see :

Brigitte Bardot Hair Tutorial

Brigitte Bardot Hair Tutorial


Brigitte Anne-Marie Bardot is a former French fashion model, actress, & singer! Here's a how-to tutorial on how to achieve her look using

Tutorials You Should also see :

Messy side bun tutorial

Messy side bun tutorial posted on bywilma


How to :
  1. Put your hair in a ponytail on the side of your head you want your bun to be.
  2. Twist your hair and bring it up to your head.
  3. Use bobby pins to secure the bun.
  4. Spray some hair spray over your bun to make it last the whole day. If you want to, you can add a flower!

Source : HAIR TUTORIAL – MESSY SIDE BUN

Tutorials You Should also see :

How to do a cool hair bow

How to do a cool hair bow


Tutorials You Should also see :

Sunday, July 22, 2012

The Polka-dot manicure tutorial

Polka-dot manicure posted no jezebel


Polka-dot manicure posted no jezebel


How to :
  1. start with the base coat
  2. Next, paint your base color.
  3. Now it's time for the dots. Start by putting one dot in the very center of your nail. Then place dots around it methodically, working off an imaginary matrix.
  4. Then brush on your top coat. And you're done!
Go enjoy your fun manicure before it chips.

Source : How To Do A Polka-Dot Manicure

Tutorials You Should also see :

Saturday, July 21, 2012

How to Curl Your hair using rags

HOW TO RAG ROLL YOUR HAIR posted on a beautiful mess


You'll need some cut fabric strips, a comb and some water.

How to :
  1. First, dampen the bottom of your hair.
  2. Next, separate a section of hair and twist it around one strip of fabric.
  3. Then, tie the fabric strip in place and repeat until the entire bottom section of your hair is rolled.
  4. After that, all you have to do is sleep on your rag rolls and remove them in the morning for pretty curls!

Source : D.I.Y. CURLS: HOW TO RAG ROLL YOUR HAIR

Tutorials You Should also see :

Friday, July 20, 2012

How to do the triangle nails

the triangle nails posted on jezebel


These nails! They look a little bit like a '30s-style "moon" manicure, but more aggressive.

the triangle nails posted on jezebel


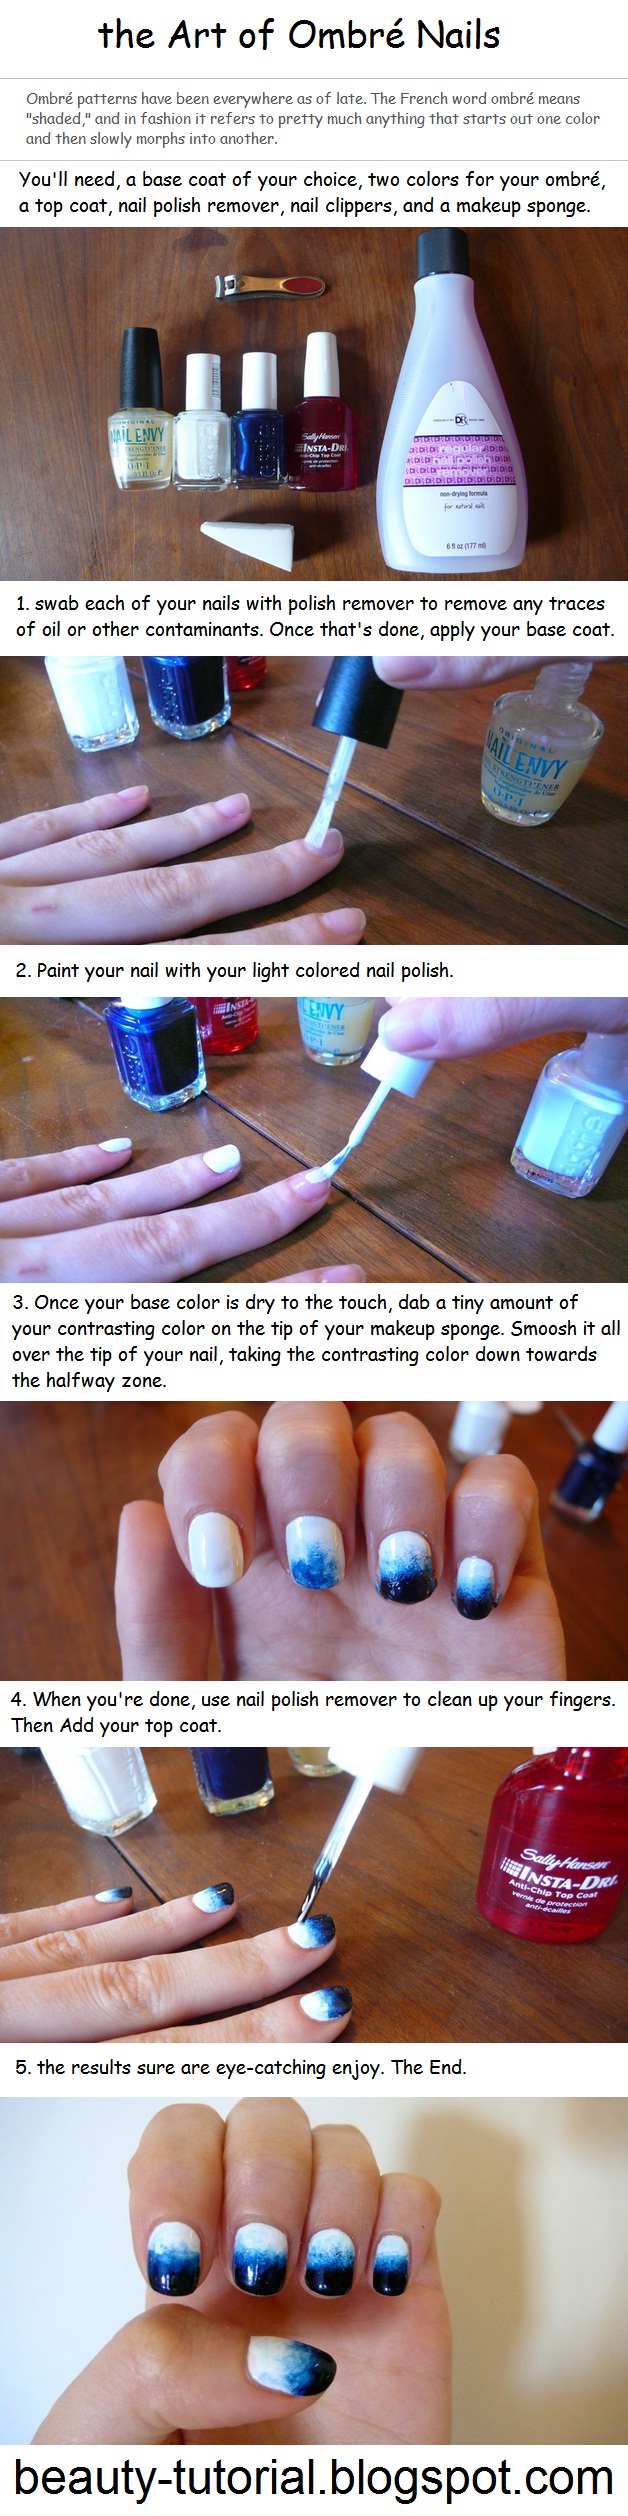
Here's what you'll need, Nail polish remover. nail file and nail clippers. Top coat. Base coat. Two colors of nail polish. if you don't have a color with a narrow brush, you could use a nail-art pen for one of your colors, or a toothpick and a regular bottle of polish.

Steps :
  1. First, prep for your manicure. When your nails are clean, shape them with the clippers and file. When you're done, wipe each nail with polish remover on a cotton ball or a tissue.
  2. Apply your base coat.
  3. make an "X" on each nail.
  4. Then use a toothpick wrapped in a little bit of cotton, and dipped in remover — to gently clean up the top of the "X" so a "V" is all that remains.
  5. Paint the bottoms of the triangles, then fill them in. Do a second layer if necessary.
  6. using your nail color, carefully paint a second, larger "X" alongside your little triangles. the two polish colors should touch at the edges, but not overlap. When the first "X" is done, take the brush and spread the nail polish out to cover the rest of the nail.
  7. Next comes the top coat.
  8. And then once it's dry, voilà!

Source : You Too Can Have Kick-Ass Nails Like Rihanna

Tutorials You Should also see :

Thursday, July 19, 2012

the art of ombre nails tutorial

the art of ombre nails tutorial posted on jezebel


Ombré patterns have been everywhere as of late. The French word ombré means "shaded," and in fashion it refers to pretty much anything that starts out one color and then slowly morphs into another.

the art of ombre nails tutorial posted on jezebel


You'll need, a base coat of your choice , two colors for your ombré, a top coat, nail polish remover, nail clippers, and a makeup sponge.

Steps :
  1. swab each of your nails with polish remover to remove any traces of oil or other contaminants. Once that's done, apply your base coat.
  2. Paint your nail with your light colored nail polish.
  3. Once your base color is dry to the touch. dab a tiny amount of your contrasting color on the tip of your makeup sponge. Smoosh it all over the tip of your nail, taking the contrasting color down towards the halfway zone.
  4. When you're done, use nail polish remover to clean up your fingers. Add your top coat.
  5. the results sure are eye-catching enjoy. The end

Source : How to Master the Art of Ombré Nails


Tutorials You Should also see :

how to do a fishtail braid hair tutorial

how to do a fishtail braid hair tutorial


Tutorials You Should also see :

How to do The Fishtail Braid Manicure

The Fishtail Braid Manicure posted on polishandpearls


This is a pretty simple design to do and I'm sure there's a few tutorials out there if you're interested in doing this on your own nails. Basically, you're just overlapping the colours diagonally all the way down the length of your nail.


The Fishtail Braid Manicure posted on polishandpearls


Steps :
  1. Paint your nails with one of the three colors you will be using.
  2. Start by painting some strips in a criss-cross pattern.
  3. Let the polish dry, then apply topcoat and you are done!

Source : How To: Fish Tail Braid Manicure

Tutorials You Should also see :


Wednesday, July 18, 2012

How to "TIE DYE" your nails tutorial

How to tie dye your nails source creating really awesome free things


How to :

  1. paint your nails a base coat. Then, tape around your nails the best you can.
  2. Fill your bowl up 3/4 of the way with water and drop your nail polish in a bulls eye pattern.
  3. Create a design with a toothpick.
  4. Quickly place your nail, palm up and dip it into the center of the bulls eye.
  5. Use nail polish remover to clean up around your nails.


Source : C.R.A.F.T. # 82: Tie Dye Nails {nail design} {marble nails}

Tutorials You Should also see :

Tuesday, July 17, 2012

Cool and Easy Tie-dye Nails Tutorial

Easy Tie-dye Nails Tutorial posted on lovemaegan


How to :
  1. Paint a base coat, I chose white, but it depends on what order you'd like your colors to display.
  2. When your base coat dries, begin with your first color {white} & at your cuticle, diagonally paint about half way up your nail.
  3. Add a large stripe of your next color {blue}.
  4. And then your final color to the tip {red}.
  5. With your pin or toothpick, AND to your WET NAIL, touch your first color {white} and drag it through your others and to the end of your nail.
  6. Wipe off your pin.
  7. Repeat step 5 & 6 until you have what looks similar to a star.

Source : Red, White, & Blue Manicure for the 4th of July

Tutorials You Should also see :

Monday, July 16, 2012

how to Give Yourself a Splatter Paint Nails

Splatter Paint Nails posted on prettygossip


How to :
  1. Paint your nails opaque white and let dry.
  2. Take a strip of tape and wrap around the finger just under the cuticle. Take another piece of tape and wrap from one side of the nail all the way around to the other side. Taping will make cleanup much easier.
  3. Place a few drops of polish onto your paper plate and dip one end of the straw into the polish . With your nail on the plate, place the straw about 2-3 inches from your nail and use a quick breath to blow out the polish.
  4. Repeat step 3 with your second polish color.
  5. Once you’re done splattering polish, remove the tape. Dip the Q-tip into the nail polish remover and use it to clean up the excess polish. Finish with a good top coat.

Source : How To: Splatter Paint Nails

Tutorials You Should also see :

Sunday, July 15, 2012

Marble Nail Art using a plastic sandwich bag

how to do the Marble Nail Art using a plastic sandwich bag
Marble Nail Art poste on polishandpearls


How to do the Marble Nail Art using a plastic sandwich bag

Source : Watercolor Nail Art: Step by Step for Pinterest


Tutorials You Should also see :

How To Do The Stippling Gradient Nails

how to do The Stippling Gradient Nails
The Stippling Gradient Nails poted on quitepolished.tumblr


How to :
  1. First you need to paint your nails with which ever color you like. 
  2. Then, using a tiny dotting tool (or a needle, possibly a toothpick, or a #18/0 spotter brush) make a bunch of dots near the tip of your nail, so many that barely any of the base color shows through. You can use nail polish for this, but I chose to use acrylic paint.
  3. After that keep working in sections, using less and less dots and making the sections ever so slightly bigger until you reach your cuticle. If you have long nails you could probably stop before the cuticle, or you could just make the sections bigger. I like to do four sections, but you could do more or less depending on how gradual you want the gradient.

The Stippling Gradient Nails poted on quitepolished.tumblr


Source : stippling tutorial

Tutorials You Should also see :

1950s Makeup step-by-step tutorial

1950s Makeup tutorial
1950s Makeup posted on theglitterguide


How To :
  1. Matte skin was a must in the ’50s. Start by applying a matte foundation (I use Korres Wild Rose Foundation). Use a powder if you prefer. Next, apply under-eye concealer.
  2. Define your eyebrows. Fill them in with a pencil, focusing on the arch. If you’re blonde, the pencil should be a few shades darker then your hair. If you’re a brunette, it should be a few shades lighter.
  3. Using liquid liner, create a winged eye that points out toward the end of your eyebrow. If you need more help, check out my tutorial here.
  4. Sweep a light brown shadow over your eyelids, then apply a darker brown shadow to the creases and outer lower lash lines. Blend until it looks seamless.
  5. Apply lots of black mascara.
  6. Place a few individual fake lashes on the outer corners of your eyes using tweezers. This highlights the winged eye and makes for a more glamorous look.
  7. Line your lips with a nude or red pencil. Next, apply your favorite red lipstick.
  8. Apply a rosy-hued blush to the apples of your cheeks.

Source : 1950s Makeup Tutorial

Tutorials You Should also see :

How to style a 60s hairdos that’s still modern enough for everyday

1960s Hair Tutorial - theglitterguide


How to :
  1. Start out by sectioning off the top of your hair and clipping it to the top of your head, out of the way. I have bangs which is an easy marker of where to begin, but if you don’t have them, start just before the middle of your head.
  2. Wave the unclipped hair by wrapping the hair around a curling iron, keeping the clamp open and holding the ends out with your hand . If you need help with this check out my tutorial here.
  3. Take the sectioned off hair out of the clip and start teasing until it is big and poufy.
  4. Flip it over and comb the top layer back so it looks smooth. At this point you should have a nice little bouffant going.
  5. Starting about an inch above your ears take both hands and pull back the hair. Secure with two bobby pins by making an x shape.
  6. Finish by waving any little bits of hair you missed and setting with hair spray .

Source : 1960s Hair Tutorial

Tutorials You Should also see :


Saturday, July 14, 2012

The Three twisted buns hair style

The Three twisted buns
Three twisted buns - joannagoddard


How To :
  1. This style is so easy, it's laughable. Day-old hair is best (which is true for most hairstyles, since it's easier to work with hair that has a little dirt in it).
  2. Divide your hair into three equal parts and quickly spray each section with a little hairspray to help give it hold. Let the hairspray set for a couple seconds, and then lightly comb it out.
  3. Take the section on your right side, and twist your hair all the way down to the end. You want to twist counter-clockwise, toward your face. Wrap the right section in on itself, just like you're making a little bun. Let some of the hair stick out, it's ok (you don't want them to look like Princess Leia buns).
  4. Pin the right bun in place. I like to use these mini bobby pins, since they're easier to hide and they're coated in rubber so they hold your hair better.
  5. Next, twist the middle section clockwise and pin. Then twist the left section clockwise and pin.
  6. Spray the three buns with a little more hairspray, and you're done!

Source : Three twisted buns

Tutorials You Should also see :