Thursday, October 11, 2012

No Heat Curls Hair Tutorial

No Heat Curls Tutorial


How To Style :
  • Step 1 : Get your hair a little damp .then Put the elastic headband around your head (partly over your forehead) .
  • Step 2 : Get a section of hair and Loop it around the headband and add the hair to your next section . and Repeat around the entire headband .
  • Step 3 : Get a good nights rest .
  • Step 4 : Take off the headband when you wake up in the morning.
  • Step 5 : Then run your fingers through (Don’t worry, if you look like Shirley Temple, the curls will relax within a few minutes).

Source : Hair Tutorial: No Heat Curl

Tutorials You Should also see :

Thursday, October 4, 2012

The Plastic Bag "Marbling" Technique

The Plastic Bag "Marbling" Technique


How to :
  • Step 1 : Paint each nail with the polish of your choise. then add a good top coat and allow your nails to dry completely.
  • Step 2 : Start by applying large bulbs of the colors of your choice onto your nails, you want theme to be pretty heavy to spreed out when you put the plastic bag on top . its okay if they are overlapping .
  • Step 3 : Then lay the plastic bag on top of your nails and press down to spreed the polish .
  • Step 4 : Apply your top coat and you're done!

Source : 31 NAILS CHALLENGE - INSPIRED BY A COLOR

Tutorials You Should also see :

How To Get Quilted Heart Nails

How To Get Quilted Heart Nails


How To Do :
  • Step 1 : Apply your base color. I recommend light cremes or creme-jellies. I suggest you avoid shimmers unless it's subtle like in the color I used.
  • Step 2 : Make three parallel dotted diagonal lines. You can do maybe 4, if you have bigger nails. I personally don't like too many lines since the black will start to over power the base.
  • Step 3 : Repeat step 2, but in the opposite direction. Try to make big squares. Skip to step 7 to make simple quilted nails. Continue to step 4 for accent nails.
  • Step 4 : Draw a heart. Haha, I guess that was a little simple. I made it big for the tutorial.
  • Step 5 : Color the heart in with the color of your choice. use 2 coats of Milani HD to make it sparkly and diamond-like.
  • Step 6 : Now go back in with the black striping polish and draw a border around the colored heart. Then Wait for the second color to completely dry before Finishing with a top coat.

Source : Quilted Heart Nail Art Tutorial

Tutorials You Should also see :

Wednesday, October 3, 2012

Bloody Nails "Splatter Manicure" Tutorial

Bloody Nails "Splatter Manicure" Tutorial


How To Do :
  • Step 1 : first use one coat of a basecoat! Topped with two coats of nude nail polish.
  • Step 2 : Then use the Splatter method with China Glaze-Ravishing Dahling (The PERFECT blood red!)
  • Step 3 : I opted to not use a topcoat because I think it makes it look like blood is really splattered onto the nails instead of it being even and all super shiny, etc

Source : True Blood Celebratory Splatter Mani!

Tutorials You Should also see :

Tuesday, October 2, 2012

Insta-Glam Red Lips Tutorial

Insta-Glam Red Lips Tutorial


How to :
  • Step 1 : Trace lips with a colorless liner (try Too Faced Borderline) to create a no-budge barrier.
  • Step 2 : To add depth and make lips look fuller, fill in pout with a lipliner a touch darker than the lipstick hue.
  • Step 3 : Apply lipstick. Blue-based reds complement fair complexions; orange-reds work well with darker tones.
  • Step 4 : Dab highlighter over the cupid’s bow to accentuate the arch.

Source : STEP-BY-STEP BEAUTY

Tutorials You Should also see :

Monday, October 1, 2012

Clear Micro Beads Manicure Tutorial

Clear Micro Beads Manicure Tutorial


How To Do :
  • Step 1 : apply a clear base coat on completely bare nails.
  • Step 2 : apply one coat of no-shimmer white polish onto your nails and let them dry.
  • Step 3 : Apply a generous second coat of color to one hand, and let the polish get tacky for 10 seconds.
  • Step 4 : over a sheet of paper, a cup, or a plastic tray, pour the microbeads over your nail bed, ensuring you coat the entire surface of your nail bed like glitter over glue.
  • Step 5 : use the pad of your finger to press and secure the caviar beads.
  • Step 6 : then apply a tiny drop of top coat along your nail tip to seal the Clear micro beads.

Source : DIY CAVIAR MANICURE

Tutorials You Should also see :

Blue Ombre Manicure Tutorial

Blue Ombre

How To Do :
  • Step 1 : Swab each of your nails with polish remover to remove any traces of oil or other contaminants. Once that's done, apply your base coat.
  • Step 2 : Paint your nail with your light colored nail polish.
  • Step 3 : Once your base color is dry to the touch. dab a tiny amount of your contrasting color on the tip of your makeup sponge. Smooch it all over the tip of your nail, taking the contrasting color down towards the halfway zone.
  • Step 4 : When you're done, use nail polish remover to clean up your fingers. Add your top coat.
  • Step 5 : The results sure are eye-catching enjoy. The end.


Tutorials You Should also see :

Twisted Side Ponytail Hair Tutorial

Twisted Side Ponytail Hair Tutorial


How to Style :
  • Step 1 - 2 & 3 : Begin by pinning a small section of hair at the back of the neck.
  • Step 4 - 5 & 6 : Continue until you can gather the hair into a side ponytail, leaving out a section in the front. Tie off the ponytail and wrap the remaining hair around the ponytail to cover the hairband.

Source : HOW TO STYLE A TWISTED SIDE PONYTAIL

Tutorials You Should also see :

Sunday, September 30, 2012

Half-moon Manicures Tutorial

Half-moon Manicures Tutorial


How To Do :
  • Step 1 : start with a coat of Wet ‘N Wild’s Metallica silver polish. and Wait for the polish to completely and thoroughly dry.
  • Step 2 : Apply the reinforcement stickers to the base of the nail bed.
  • Step 3 : start painting on the second color. Ensure a clean contrasting line of color by painting on top of the sticker and around the edges. Don’t be afraid to get polish on your fingers, that’s easily removable.
  • Step 4 : Wait for the second color to completely dry before peeling off the stickers. then Finish with a top coat and voila, easy-to-do half-moon manicures!

Source : Easy DIY Half-Moon Manicures

Tutorials You Should also see :

The Demi-Twist hairstyle Tutorial

The Demi-Twist hairstyle Tutorial


How To Style :
  • Step 1 : Curl your hair with a 1 1/4-inch iron, spraying each 1-inch section with hairspray. This provides both hold and protection from heat.
  • Step 2 : Back-combe not only the top, but also a bit beyond the round of your head for a stronger foundation and less Bump-It!-like volume. Use a brush with small bristles to lightly smooth the surface of the area, only skimming hair, so as not to remove the “nest.”
  • Step 3 : Smooth one side of your hair back, leaving out your bangs/fringe if you desire them in the finished look. Pin with 3-4 bobby pins in a vertical column near the center back of your head.
  • Step 4 : Twist the remaining side back. The twisted portion of hair should be placed over the pins from step 3. Hold the twisted hair over the previous pins and use a few more pins to secure the twist into your back-combing. Finish with more hairspray and voila!

Source : TWIST AND SHOUT: THE DEMI-TWIST TUTORIAL

Tutorials You Should also see :

Saturday, September 29, 2012

Fishtail Braid Updo hair Tutorial

Fishtail Braid Up-do hair Tutorial


How to Style :
  • Step 1 : Gathering your hair to the side and secure it with a thin rubber hair tie. Divide it into two sections.
  • Step 2 : Hold both sections in one hand, separated by your pointer finger, and use your other hand to grab a small piece from the outside of one section.
  • Step 3 & 4 : Repeat step 2 until you’ve just about reached the end and secure it with an elastic. It’s even better if it’s messy, so pull out some strands and roughen up the braid a bit.
  • Step 5 : If you want to turn your fishtail into an updo, start by rolling the braid inward and up towards the nape of your neck.
  • Step 6 : Secure the rolled bun with bobby pins. The looser and messier the bun, the better!

Source : Do the Fishtail

Tutorials You Should also see :

Twisted Half Updo Hairstyles

Twisted Half Up-do Hairstyles


How to Style :
  • Step 1 : take the top half of your hair and split it into two sections, parted down the middle.
  • Step 2 : Twist each section a few times around your fingers (like you're twirling your hair) and then bring them together in the center.
  • Step 3 : Instead of just pinning it like that which I often do, I gave the whole thing one more flip up and then down again in the back and secured it with one small butterfly clip.

Source : twisted

Tutorials You Should also see :

Friday, September 28, 2012

Marble Nails Using a Plastic Bag Tutorial

Marble Nails Using a Plastic Bag Tutorial


How to :
  • Step 1 : Paint each nail with the polish of your choise. then add a good top coat and allow your nails to dry completely.
  • Step 2 : Start by applying large bulbs of the colors of your choice onto your nails, you want theme to be pretty heavy to spreed out when you put the plastic bag on top . its okay if they are overlapping .
  • Step 3 : Then lay the plastic bag on top of your nails and press down to spreed the polish .
  • Step 4 : Apply your top coat and you're done!

Source : Watercolor Nail Art: Step by Step

Tutorials You Should also see :

Thursday, September 27, 2012

The Flaming Nails Tutorial

The Flaming Nails Tutorial


You will need :
- Nail Polish Colors - White, Red, Orange, Yellow, and Black or Teal for the background
- Baggie - Like a Sandwich Baggie or whatever size you have
Quick Drying Top Coat

Source : manic MANI MONDAY: FLAME MANICURE

Tutorials You Should also see :

Beachy Waves Hair Tutorial

Beachy Waves Hair Tutorial


How to Style :
  • Step 1 : Get a Curling iron that get really hot.
  • Step 2 : Warp the hair away from the face, only using the inside part of the iron, for about 15 seconds and don't use the clamp.
  • Step 3 : Repeat step 2 around your entire head, grabbing small sections and wrapping around the iron.
  • Step 4 : Spray hair with a shine serum with a little hold.
  • Step 5 : Scrunch up hair and rake your fingers from roots to tips so that the waves aren't too perfect.

Source : How To: Beachy Waves

Tutorials You Should also see :

Braided Bun Hairstyle Tutorial

Braided Bun Hairstyle Tutorial


How to Style :
  • Step 1 : Start with your hair parted to one side. then grab a strand of hair from the top of your head and divide it in tow. then place the front strand over the back strand.
  • Step 2 : Repeat step 1 all the way to down to tie in ponytail.
  • Step 3 : Bind all the hair into a low ponytail. Then tie the ponytail to a bun.
  • Step 4 : Fasten the bun with a bobby pin and a little of hairspray.

Source : How To: Braided Bun

Tutorials You Should also see :

Wednesday, September 26, 2012

Boho Braided Side Bun Tutorial

Boho Braided Side Bun Tutorial


How to Style :
  • Step 1 : Part your hair asymmetrically, and begin French braiding from the temple of the side of your head with less hair to directly beneath your ear on the opposite side.
  • Step 2 : Continue braiding down like normal for an inch or two, and then tie off the end with a clear elastic hair tie.
  • Step 3 : Using a curling iron, wrap the rest of your hair away from your face to create loose, summery beach waves.
  • Step 4 : To balance out your French braid, grab a few random pieces from the opposite side of your head and do a loose twist.
  • Step 5 : Join the French braid and twist together to fashion a very organic, boho chic side bun.
  • Step 6 : Secure your bun with several bobby pins, and to add a bit of texture, spray your updo with Hairspray. et Voila!

Source : A Boho Braided Side Bun Tutorial (And Hair Product Giveaway!)

Tutorials You Should also see :

Monday, September 24, 2012

Big Heart Nails Tutorial

Big Heart Nails Tutorial


How to :
  • Step 1 : First Print out or draw hearts on a piece of paper. Put the paper in the plastic sleeve. Fill in the heart shapes with the color you want the hearts to be. Outline the hearts with black
  • Step 2 : Paint your nails whatever color you want the base to be.
  • Step 3 : After the hearts have dried, peel off each one very slowly.
  • Step 4 : Then place the hearts on the center of your nails.
  • Step 5 : Cover the nails with clear nail polish and you are done!

Source : manic MANI: BIG HEART NAILS

Tutorials You Should also see :

Sunday, September 23, 2012

Crimson Curls Hair Tutorial

Crimson Curls Hair Tutorial


How To Style :
  • Step 1 : Use a one inch sized curling iron and curl your entire head of hair.
  • Step 2 : Figure out where you want to apply your brightly colored extensions, curl the pieces and put them in.

Tutorials You Should also see :

The Wrap Around Braided Bun Tutorial

The Wrap Around Braided Bun Tutorial


How to Style :
  • Step 1 : French braid your hair horizontally from one side of the head to the other. start above your ear.
  • Step 2 : then pin the braid in place. after that pin the bangs back.
  • Step 3 : use your fingers to creat a roughed up texture by sliding them from ends up. Then twist the hair loosely.
  • Step 4 : pin your hair randomly into a bun shape . and voila!

Source : Wrap Around Braided Bun [Hair Tutorial]

Tutorials You Should also see :

Friday, September 21, 2012

Super Quick Waterfall Braid Tutorial

Super Quick Waterfall Braid Tutorial


How to Style :
  • Step 1 : First brush through all of the hair to ensure there are no knots or tangles, Then take a section from the front of your hair line. Split this section into three equal pieces and begin to create a three strand braid. Making sure you are braiding along your head, not downwards, otherwise you will end up with a droopy looking braid!
  • Step 2 : Once you have started your braid you will be adding sections from the top of your hair not the underneath!! This is how you get the effect of the waterfall. So, each time you are braiding, you will be adding a section from the top of the hair and continuing to braid, dropping the section that you have just braided and then braiding and adding a section from the top again. Continue doing the above steps until you are half way around your head.
  • Step 3 : Secure your braid with a rubber band , Then give your hair a tousle with your hands, Spritz with hairspray to flatten any wispy bits of hair sticking out and then you’re ready to show off your waterfall braid and enjoy!

Source : Waterfall Braid Hair Tutorial

Tutorials You Should also see :

Thursday, September 20, 2012

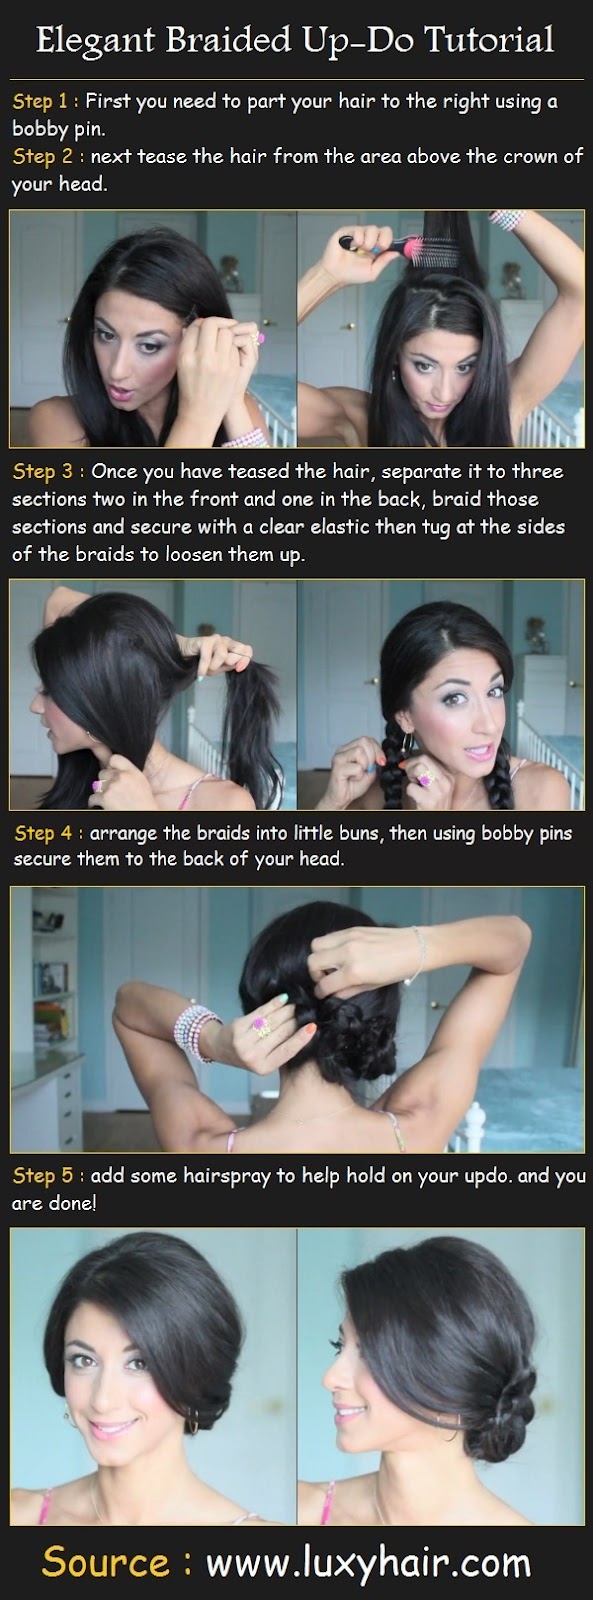
Elegant Braided Up-Do Tutorial

Elegant Braided Up-Do Tutorial


How to Style :
  • Step 1 : First you need to part your hair to the right using a bobby pin.
  • Step 2 : next tease the hair from the area above the crown of your head.
  • Step 3 : once you have teased the hair, separate it to three sections two in the front and one in the back, braid those sections and secure with a clear elastic then tug at the sides of the braids to loosen them up.
  • Step 4 : basically arrange the braids into little buns, then using bobby pins secure them to the back of your head.
  • Step 5 : add some hairspray to help hold on your updo. and you are done!

Source : Luxy Hair Extensions

Tutorials You Should also see :

Wednesday, September 19, 2012

Braided Updo Hairstyle Tutorial

Braided Updo Hairstyle Tutorial


While this braided updo may look like it takes a PhD in follicular manipulation to achieve, it's actually surprisingly simple, a little tucking here, some twisting there, and then you roll it all up and you've got yourself a snazzy new style.

Source : Easy Braided Updo Tutorial

Tutorials You Should also see :

Elegant Half-up Half-down Hairstyle

Elegant Half-up Half-down Hairstyle


How to Style :
  • Step 1 : First Curl your hair using a curling iron just large chunks of hair and curl the ends and that all you need.
  • Step 2 : Grab a section of hair from the lift side underneath your hair and it have to be about two inches in Thickness. Once you have your section create a regular three strand braid then secure the end with an elastic band once you get to the bottom.
  • Step 3 : Once you have your braid, separate a section of hair from above the crown brining it back. that's going to be the section we are going to tease a little bit for now just put it up using a clip.
  • Step 4 : Now grab your braid and bring it over the crown of your head, then pin it in the other side above your ear using boby pins.
  • Step 5 : now separate the hair you pined using a clip it into smaler sections. thin put a smale amont of hairspray and use a hairbruch to tease the hair.
  • Step 6 : Next, you have to secure the hair in the back of your head using a few boby pins, and you're done.

Source : Luxy Hair Extensions

Tutorials You Should also see :

Tuesday, September 18, 2012

Messy Updo Hairstyle Tutorial

Messy Updo Hairstyle Tutorial


The messy updo is still hot. For most of the female population that is a good thing. This will make your lives a lot easier come time to create "the messy updo".

Tutorials You Should also see :

4th of July Manicure Tutorial

4th of July Manicure Tutorial


How to Do :
Step 1 : pick 3 colors one for the base and two contrasting colors.
Step 2 : Paint each nail with the polish of your choice. Add a good top coat and allow your nails to dry completely.
Step 3 : .Pour 1 drop of polish on a paper plate. Then use a toothpicks or skewers to draw lines across your nail with your first color (red).
Step 4 : Repeat steps 2 with the 2nd stripe color (blue).
Step 5 : Seal with a clear coat and Voilà. Stripey Nails!

Source : Patriotic Nails


Monday, September 17, 2012

Fishtail Braid Hair Tutorial

Fishtail Braid Hair Tutorial


This hair tutorial will show you how to create a messy fishtail side braid. It's a very funky and edgy braid that is super easy to do. Just try it a few times and once your fingers get used to the technique it will seem like a piece of cake!

Source : Fishtail Braid Tutorial

Tutorials You Should also see :

Sunday, September 16, 2012

Chevron Tape Manicure Tutorial

Chevron Tape Manicure Nail Tutorial


How to Style :
  • Step 1 : Paint each nail with the polish of your choice. Add a good top coat and allow your nails to dry completely.
  • Step 2 : Apply the first piece of tape at the bottom of your nail so the corner points up toward the center. Overlap the other two pieces at the top of your nail to create the chevron shape in the center of the nail.
  • Step 3 : Paint over the Scotch tape with a contrasting polish.
  • Step 4 : While the polish is still wet, slowly remove the tape to reveal your design. Once the second color is dry, apply a top coat. You can stop here with this fun two-toned manicure or keep on going!
  • Step 5 : Overlap two pieces of tape to section off a triangle at the base of each nail. Fill in the triangle with a contrasting color.
  • Step 6 : Remove the tape to reveal your finished look. Add a top coat for shine and protection, and get ready to show off this fun, modern mani.

Source : NAIL DESIGNS YOU CAN ACTUALLY DO


Cute & Quick Boho UpDo Tutorial

Cute & Quick Boho UpDo Tutorial


How to Style :
  • Step 1 : take your teasing brush and gently tease the hair at the back of your head to get more volume.
  • Step 2 : Pop the headband on top of your head like a crown.
  • Step 3 : Take a small section of your hair from the front, fold it over the hairband and pull it back through, underneath the headband. Keep pulling the hair up, over and through until you get to the end of the section.
  • Step 4 : Repeat for all the sections of hair until it's all neatly tucked into and around your headband. Et 'voila! Pretty boho hair!

Source : Cute & Easy Up-Do

Tutorials You Should also see :

Lace Faux Braided Ponytail Tutorial

Lace Faux Braided Ponytail Tutorial


Steps :

  • Step 1 : Tie your hair back in a loose ponytail using a hair elastic.
  • Step 2 : Find the center of your length of lace and hold it up to your head . wrap both ends around your head and tie in a double knot underneath your ponytail.
  • Step 3 : Slip your hair elastic off but still keep the ponytail shape then criss cross the two pieces of lace over each other.
  • Step 4 : Continue criss crossing till you get as far down as you wish then tie in a knot / pretty bow. Pull a few pieces out at the sides to fatten up your 'faux braid'.

Source : Simple & Pretty DIY Hairstyle Using Lace

Tutorials You Should also see :

Friday, September 14, 2012

Color Clash Makeup Tutorial

Color Clash Makeup Tutorial


Steps :
Step 1 : Do Shadowbase across the eyelid and up towards the brow bones. Press The Eyeshadow across the eyelid from inner to outer corner and follow the socket line creating a solid block of colour.
Step 2 : Using Shadowline, make a paste by dipping the wand into Ink Blot Twinkle Baked Powder Eyeshadow and mix on the back of your hand and draw the line above upper lash line.
Step 3 : Apply lashings of your favourite mascara to the upper lashes only. Using the nude lip liner, start at the cupid's bow and fill in lips. For a professional finish use the lip brush to apply across the lips, blot with a tissue and reapply for a long-lasting finish.


Source : Christmas Clash

Tutorials You Should also see :

Curling with a Flat Iron Tutorial

Curling with a Flat Iron Tutorial


Dont underestimate the power of your flat iron. Flat irons aren't just for creating straight hair styles, they can also be used to create flips, waves and curls. in this tutorial sorella salon and Spa show you the technique for curling your hair with a flatiron.


Source : Tutorial: Curling with a Flat Iron

Tutorials You Should also see :

Thursday, September 13, 2012

How to Do a Waterfall Braid

How to Do a Waterfall Braid


How to Style :
Step 1 : Gather hair on one side and start a french braid. If you start the braid close to your hair line, create a regular french braid for the first 1-2 sections of hair you add to the braid. This will make sure that the cascading hair doesn't fall in your face.
Step 2 : Every time you grab a section of hair from the top of your head to add to the braid, let it fall and replace it with a new section of hair.
Step 3 : Continue your braid until you reach the other side of your head.
Step 4 : Secure with bobby pins and spray with hair spray to hold your braid in place. and you are done.


Source : Tutortial: Waterfall Braid

Tutorials You Should also see :