Wednesday, June 6, 2012

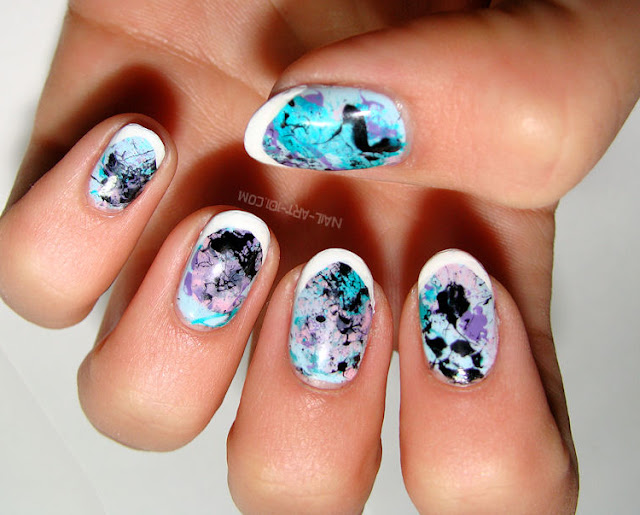
cool and easy Splatter nails Tutorial

cool and easy Splatter nails Tutorial
cool and easy Splatter nails posted on nail-art-101


this tutorial is a breeze, Aside from the mess. and I got so many compliments on them. Play around with your color choices and make something beautiful!

cool and easy Splatter nails Tutorial
cool and easy Splatter nails posted on nail-art-101


1 - Start with a base color. optional : tape your nail to help with clean up.
2 - put a blob of polish on a piece of paper and dip a straw in it.
3 - hold the straw above your nail and blow sharply to splatter the polish Repeat withe other colors.
4 - Clean up the design with acetone and a cotton pad, or a fine brush for cuticles.

Source : splatter nails tutorial

Tutorials You Should also see :

how to Get Split Nails tutorial

how to Get Split Nails tutorial


Split Nails : This chevron design is a way sophisticated take on the reverse French manicure.

1 - Start by painting nude polish on the bottom of your nail in a rough triangle.
2 - Then, taking a thin, black brush, draw two criss-crossing hatchmarks over your nail. You should be drawing over the nude polish, but not leaving any bare nail exposed below the triangle. Then, fill in the rest of the nail with black.

Tutorials You Should also see :

how to Get cute Ombre Nails

how to Get cute Ombre Nails


Ombre Nails : you don't need an airbrush to master this look. All you need are two polish colors and a good dabbing hand!

1 - Start by painting the darker color in a rough U-shape. Don't forget to lay it on thick!
2 - Next, fill in empty space with the lighter color. Wipe off the excess polish, and start swirling where the polishes meet.
3 - A layer of topcoat will help blend the colors together more!

Tutorials You Should also see :

How to Get cute Spotted nails

How to Get cute Spotted nails


Get Spotted nails : This is a super-easy nail design that just requires a thin-brushed polish (you can find these at most drugstores!).
1 - Start by applying a few coats of a base polish.
2 - Then, using the thin brush, make small dots scattered around the perimeter of your nail in varying sizes.


Tutorials You Should also see :

Monday, June 4, 2012

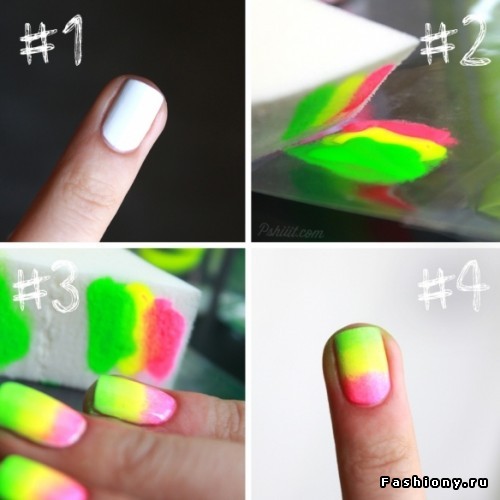
How to get the ombre stain nails look

I have seen lots of ombre techniques in the past, but this one is pretty cool because it’s done on your bare nails and has more of a stain effect than looking like actual nail polish. This was much easier than I thought it was going to be.

How to get the ombre stain nails look
the ombre stain nails osted on fashiony.ru


You will need :
  1. 3 gradient nail polish colors.
  2. clear top coat.
  3. triangle makeup sponge.
  4. cup of water.
  5. piece of paper for blotting the polish
  6. paint brush
  7. nail polish remover for clean up.

Tutorials You Should also see :

how to straighten your Curly hair

how to straighten your Curly hair


Step by step instructions to straighten curly hair:
  • Once you take a shower, air-dry your hair until they are damp.
  • Remove the tangles with the help of large paddle brush.
  • Separate your hair in two layers. You would require six hair bands.
  • Divide every layer into three parts.
  • Now there would be six divisions. Now tie your hair with the bands.
  • Unwrap your hair and allow your hair to dry flat.
  • Paddle brush your hair once again.

Tips for Straight hair:
  • To straighten your hair you can apply hair straightener.
  • You can even use hair dryers along with large round brush.
  • Right after shampoo use a wide toothed comb to straighten your hair from ends to roots.
  • Blow-dry your hair using fingers instead of a bush, until they are half dry. This helps in removing excess water from your hair helping you to blow dry your hair and it also saves time.
  • Get a hair cut after every four to six weeks in different angles. This will help you reduce the excess volume.
  • When your hair is wet brush them and apply hair spray. This will help you straighten extra curly portion of your hair and reduce the overall hair volume.
  • Apply a conditioner or a hair product to protect your hair from against damages caused due to heat or sun.
  • Rinse your hair with cold water after shampoo. This makes the hair smooth and closes the cuticles and your hair wouldn't get a frizzy effect.
  • Use flat irons to unlock your curls. Avoid doing it regularly.
  • If you notice static electricity in your hair, dip your fingers in water and dab your head. When you dab your hair with wet fingers, ensure you hair are not extremely wet.

Tutorials You Should also see :

Sunday, June 3, 2012

How To Style a Crown Braid Tutorial

How To Style a Crown Braid Tutorial


Learn how to style your hair into a beautiful crown braid for day or night with seven simple steps

Steps :

1 - Start by dividing your hair into two sections. Braid the first section all the way down to the end.
2 - Bring the braid over your head, covering your ear.
3 - Secure the braid in place with bobby pins. use four to five pins per braid. Place the bobby pins behind or under the braid.
4 - Braid the second section of hair all the way down to the end.
5 - Bring the second braid over your head so that it covers the end of the first braid. Tuck the end of the second braid behind the first.
6 - Pin down the braid so that it's secure.
7 - Use bobby pins to tidy up any loose pieces of hair.

Tutorials You Should also see :